Quick Tip – Multi Project Solution in VS11

I’m using Visual Studio 11 since it was released as Beta. What can I say, I really get the new design and layout (monochrome and gylphs) which not every developer appreciates. But beyond design and layout I really like the new search feature and the navigation features added in the Solutions Explorer section.

Going to the quick tip, if you have created a project in Visual Studio 11 Beta and would want to add another project under the same solution you would get this:

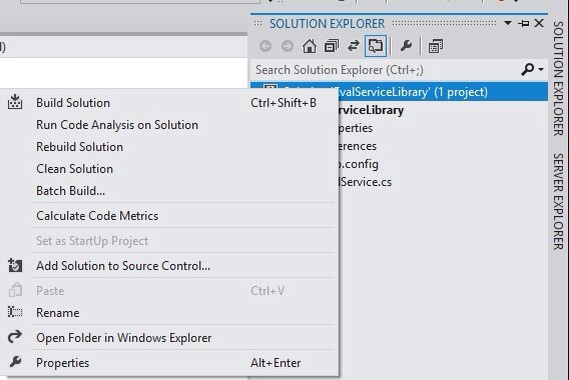
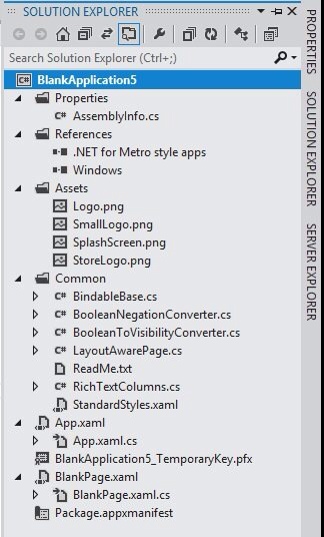
Solution explorer without add new project

Yes no option to add new project! Normally (like in VS 2010) you will use the solution explorer to add a new project but there is no option on VS11 Beta.


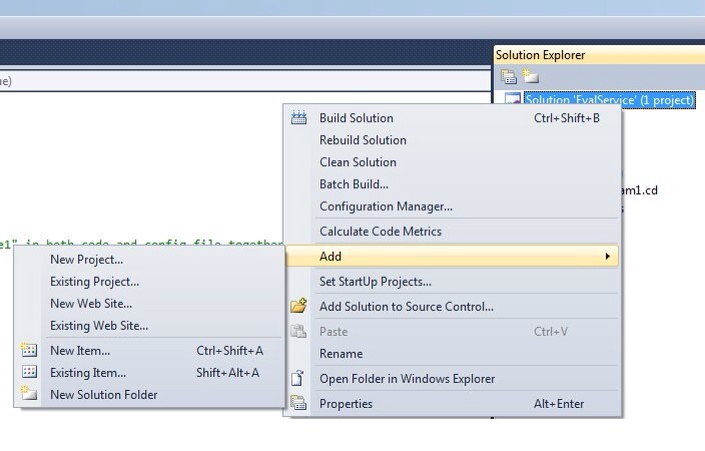
Solution explorer in VS2010 with Add Project option

Solution:

To add another project just go to File – New Project – Choose any Template. On the same window at the lower portion you can find the Solution option. You have the option to Create a new solution or Add to solution.

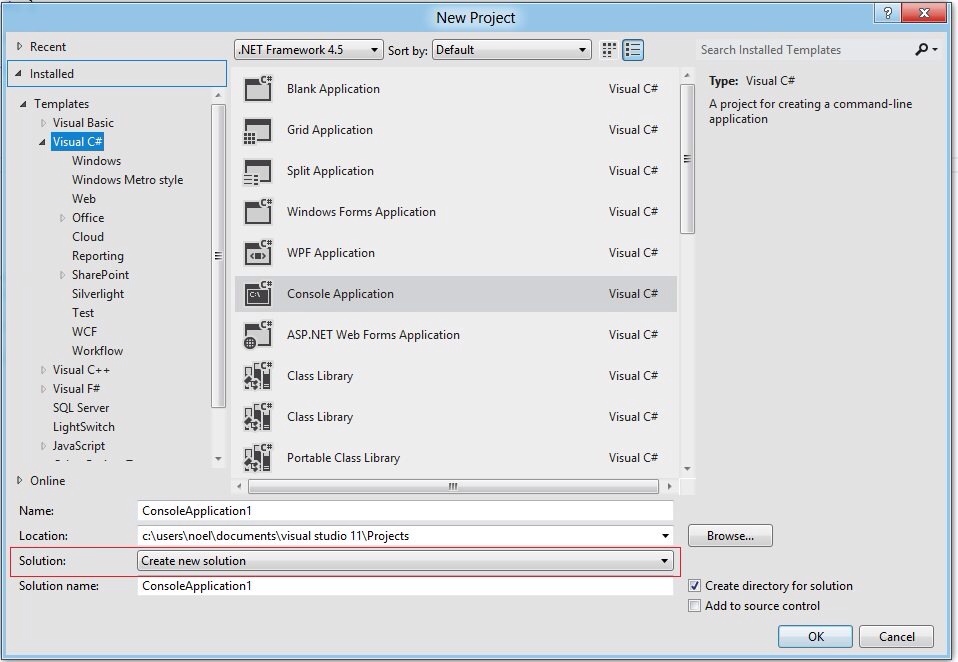
Solution option under file-new project

This is where you can add existing projects to your solution. Note that this option is also available in Visual Studio 2010.

Solution Explorer not showing the Solution file?

If the solution is not showing in the solution explorer check if the Always show solution is enabled in your Visual Studio

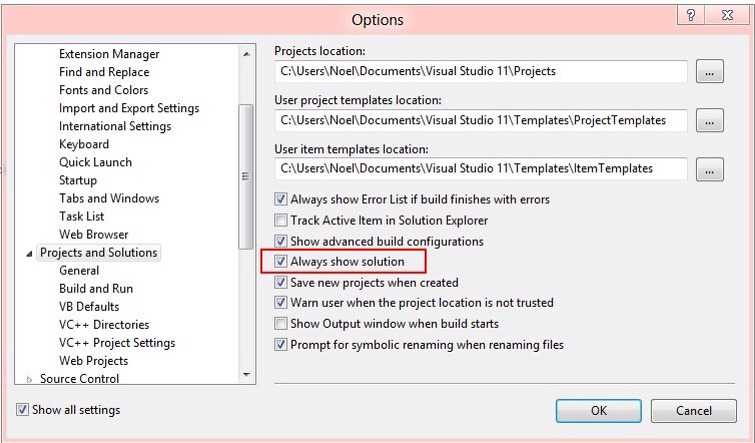
Visual Studio Options screen

Go to Tools – Options – Projects and Solutions – General – Tick the Always show solution option.

There it is, a quick tip on working around Visual Studio 11. Enjoy VS!


Creating My First Windows Metro-style App


I’ve blogged last month on how to get started on building metro-style applications. Since then, I’ve been trying out the sample projects made by the Windows team to help developers be up to speed with Metro-style application development. The official Sample Pack is 306.4MB in size as of this writing. You can even vote a sample request that you would like the Windows team to add in the samples pack – Metro style apps Requests for Samples. The latest completed request is a sample USB Barcode Scanner, nice!

Blog Reader App

After checking on the samples and creating sample projects, I decided to create a basic application with Metro-style. I do not need to look far since one of the article is on how to create a basic Blog Reader. That will be a great app to start with especially if there is a step-by-step guide available 🙂

Basic Layout

This application sample lets you create the layout using the Metro style Blank Application template first. Using XAML, the layout will be created by manually adding a Grid, ListView and a Webview for the HTML content. Creating the layout in XAML is very similar to creating UI in Silverlight and other projects you created using WPF with XAML.

Blog reader app not using the template

Blank Template Xaml Project

Data Binding

Windows.Web.Syndication

Next we need go to get the data like thd Title, Author, Date of Post and the article from the blog. This data is available through RSS or Atom feed. These feeds will be taken care of by the SyndicationClient class so we do not have to worry about converting the feed or the data to XML.

SyndicationClient client = new SyndicationClient();SyndicationFeed feed = await client.RetrieveFeedAsync(feedUri);

Note that the Windows.Web.Syndication is new in WinRT. The .Net version of this library is the System.ServiceModel.Syndication. Shawn Wildermuth experienced a problem about images being stripped out when using the Web.Syndication namespace. Not the same case with this sample app though. Shawn mentioned from his tweet that this may not be true for all feeds.

Async and Await

Since we are using the SyndicationClient class, we need to implement an asynchronous process to retrieve the feeds. The async and await will help us implement asynchronous calls in WinRT.

public async Task GetFeedsAsync(){    
Task feed1 = GetFeedAsync("http://windowsteamblog.com/windows/b/developers/atom.aspx");    ...    
this.Feeds.Add(await feed1);    ...}

Notice in the code above, the async keyword is added in the method signature. This is required for us to use await keyword. The await keyword makes our application responsive while the application waits for the result of the call to retrieve the feeds. Simple implementation of an asynchronous operation, nice!


Using the Templates

In Visual Studio 11, you have the option use the Metro style templates like the Split Application and the Grid Application template. Using these templates can save you the time to layout your view just like in this case where we can use Split Page template to show the main blog list on the left and then at the side show the posts made on that blog.

Split view blog reader


Other sections described by the blog reader sample application are adding an app bar for your application options and the Storyboard where you can define the layout transitions e.g full screen, snapped.

I’m happy to be able to create this sample app and be able to look deeper into Metro style development. More metro style apps in my future posts!

Reference Links:

Windows 8 Consumer Preview Metro style app samples – C#, VB.NET, C++, JavaScript

Github Repo on Actual Source Code of this project


The New iPad Unboxing – My First iPad

Retina logo

I’m one of those persons that did not get it when the first generation iPad was launched in 2010. That time I thought why would someone use such a device for computing and daily consumption of media. I really agree back then with the comment that its a super sized iPod Touch! 🙂 I like ultra portable devices which I can carry in my pocket and discreetly use it whenever I need it for email, internet and games – that’s why I have my iPhone. If I want to use a bigger screen there is my ever reliable Macbook Pro, so I do not need an iPad.

iPad 2

When iPad 2 was released in 2011, I considered getting one because of the improvements in its form factor. It was 33% thinner and 15% lighter than the first iPad. The problem is it still uses the same screen resolution from the first iPad. Games and apps will still look the same in the screen with the same image quality. Nice improvements but not enough to snatch my 30K pesos. I decided not to get one.

My First iPad

When the new iPad was launched last month, everyone is expecting that it will have an improved screen resolution. Same as the Retina display used with the last two recent iPhone versions – iPhone 4/4S. Even the invite from Apple indicates that the screen has to be the main feature that will be upgraded. That is how much everyone wants the Retina display to be in a 9.7 inch screen like the iPad, even Apple knows they have to highlight that feature.

The upgraded processor, memory and camera is nothing compared with the upgrade to the Retina display feature in my opinion. What will the iPad look like if no Retina display was used in this version? An iPad 2S!

I was able to get a friend order the new iPad in the States last March 7. It was released and delivered in the States on the 16th. I got an iPad White 32GB Wifi only. I’m not too optimistic that 4G will be “fully” implemented in the Philippines soon. Anyway, I’m so excited that I even made sure to check everyday that the order did pushed through. After waiting for 2 weeks, I got my very first iPad unit!

Unboxing

Ipad box
iPad still sealed in the box

Ipad box cut
iPad first cut through to the box

Ipad lift from box
iPad first lift from the box

Ipad front
iPad front, first hands-on

Ipad accessories in box
iPad accessories inside the box

Ipad plastic peel off
iPad first peel of plastic

Ipad back buttons
iPad usual buttons at the back

Ipad Thank you Setup
iPad after user setup

Retina
iPad Retina Display

Reviews:

Some noteworthy reviews from the experts.

The Retina display is worth the wait. I would not want to have anything less than an HD screen on my next tablet for sure. Widescreen resolution next for iPad? There is a lot to look forward to for 2012 as Tim Cook said from his last keynote. Do not worry about me for now, I’m a happy camper with my new iPad.

by