About Noel Arlante

Here are my most recent posts

SOAP Requests Using Postman Error – Solved!

Postman logo+text 320x132

You have an existing working SOAP project in SOAPUI that you want to run in Postman but you cannot make it work due to a 500 Http error or some other error? Follow the steps below to make it work 🙂

First..

From SOAPUI copy your SOAP message and then paste it to Postman. I’m using a sample ASMX service for global weather below.

Soapmessage

From this blog post from Postman, their advised is to add the wsdl and operation tags in the message. But this does not work for me.

And then..

From Postman make sure the Content-type is text/xml.

Postmanxmlmsg

<soapenv:Envelope xmlns:soapenv="http://schemas.xmlsoap.org/soap/envelope/" xmlns:web="http://www.webserviceX.NET">
   <soapenv:Header/>
   <soapenv:Body>
      <web:GetCitiesByCountry>
         <!--Optional:-->
         <web:CountryName>Philippines</web:CountryName>
      </web:GetCitiesByCountry>
   </soapenv:Body>
</soapenv:Envelope>

Here’s the trick

Some SOAP web services will work with just the message in an envelope format. But if not, try adding a SOAPAction in the header of your request just like in the sample below.

Postmanheader

Here is the full request headers and body.
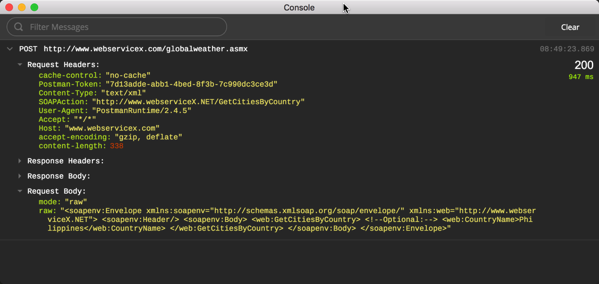
Postmanconsol

curl -X POST -H "Content-Type: text/xml" -H "SOAPAction: http://www.webserviceX.NET/GetCitiesByCountry" -H "Cache-Control: no-cache" -H "Postman-Token: 3e9ad6f4-e669-18ef-6da1-c603371ca1c6" -d '<soapenv:Envelope xmlns:soapenv="http://schemas.xmlsoap.org/soap/envelope/" xmlns:web="http://www.webserviceX.NET">
   <soapenv:Header/>
   <soapenv:Body>
      <web:GetCitiesByCountry>
         <!--Optional:-->
         <web:CountryName>Philippines</web:CountryName>
      </web:GetCitiesByCountry>
   </soapenv:Body>
</soapenv:Envelope>' "http://www.webservicex.com/globalweather.asmx"

This will do the trick in making SOAP requests using Postman. Enjoy!

How To Setup FastMail Using Your Own Domain with DNSimple

Fastmail logo

I’ve been looking around for email hosting services and found some leads from the HackerNews AskHN site. One of the suggestion is FastMail because of the relatively low pricing, good support and can be setup using your own domain. I’m posting this to share my experience on how to setup Fastmail using your own domain with DNSimple.

FastMail

FastMail setup is a breeze. Upon sign up you can readily use a fastmail domain hosted email (fastmail.com; also there is 30-Day free trial). At this point you can you can basically check if fastmail meets your needs for email hosting e.g. storage size, device / calendar sync, setup your own domain. For me, I’m more interested on how easy it is to setup FastMail using your own domain with DNSimple.

DNSimple

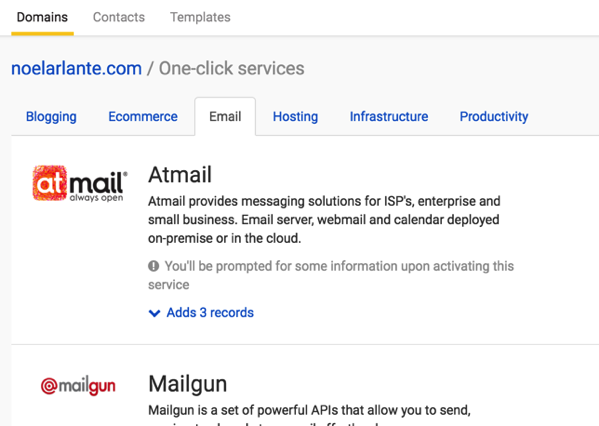
Since 2014, I’ve used DNSimple for my DNS needs also posted here the steps when I changed my DNS provider to DNSimple. They have a one click service that will add dns records to help you setup dns records with known services like FastMail.

Dnsimpleoneclick
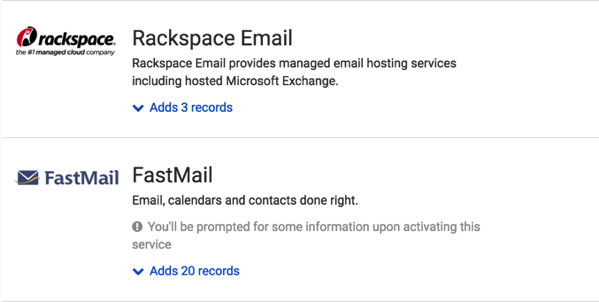
Dnsimplersandfastmail

Setting Up

First step is from FastMail get the following mail exchange (MX) record values.

Fastmailmxrecords

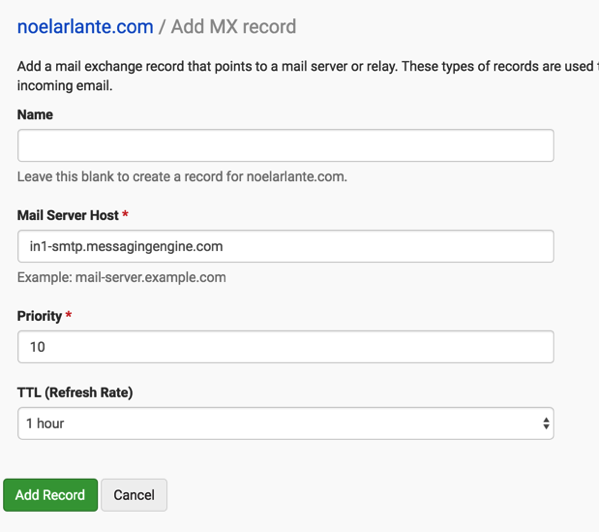
Configure these record values in DNSimple by adding the MX records.

Dnsimplemxrecord

Note: Do the steps above before adding the FastMail One Click Service from DNSImple. I missed these steps the first time so I ended up not completing the setup.

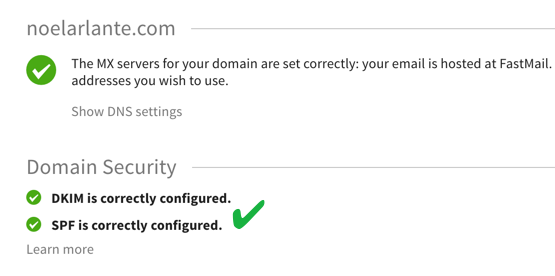
From FastMail, go to Settings -> Domain. Here you can check if proper MX records are set. If yes, you can see a similar message below.

Fastmailmxgood

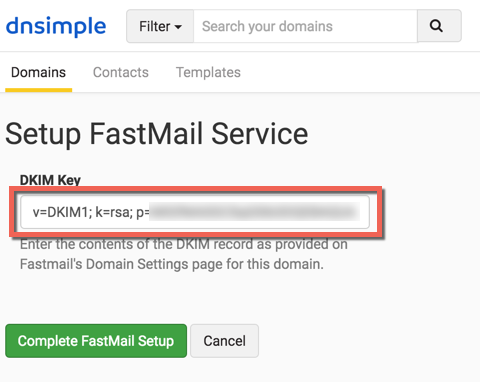
From DNSimple, add the FastMail One Click Service to add DNS records needed by FastMail. You need to input the DKIM value from FastMail to complete the setup from DNSimple.

Dnsimplefastmailconfirm

Fastmail will confirm the setup just like the message below.

Fastmaildkimok

Now you are all set with your own domain email hosting. That’s how easy it is to setup FastMail using your own domain with DNSimple.
Keep in touch!

Brew Refusing To Link OpenSSL – .Net Core on Mac

Dotnet

As mentioned in my previous post on exploring .Net CLI, I encountered a problem doing “dotnet restore” on my machine. The problem is brew refusing to link openssl after I updating brew. Here is the old steps as instructed from dot.net website.


brew update

brew install openssl

brew link --force openssl

After issuing the command “brew link –force openssl” I encounter this message from brew.


Warning: Refusing to link: openssl
Linking keg-only OpenSSL means you may end up linking against the insecure,
deprecated system version while using the headers from the Homebrew version.
Instead, pass the full include/library paths to your compiler e.g.:
  -I/usr/local/opt/openssl/include -L/usr/local/opt/openssl/lib

This is the reason why “dotnet restore” is not working with getting the libraries to my machine. I even logged an issue on .Net CLI github to document the error. It seems brew developers blocked the “brew link –force openssl” command to openssl as noted on this brew commit on github.

Since then dot.net updated their instructions to the following to fix the issue.


brew update

brew install openssl

ln -s /usr/local/opt/openssl/lib/libcrypto.1.0.0.dylib /usr/local/lib/

ln -s /usr/local/opt/openssl/lib/libssl.1.0.0.dylib /usr/local/lib/

It may be a short term work around as the original logged issue about the error on linking openssl is still open as of today. The good news is that you can now work with .Net Core with .Net CLI on Mac. Lets wait and see. Happy coding!

Dotnet Restore Command Not Found – Exploring The New DotNet CLI

Aspnetcore 1

It has been a year since I posted Taking Visual Studio Code and ASP.Net 5 For A Spin on which I tried to create a simple ASP.Net 5 web application using the then just released free Visual Studio Code. Microsoft also released in Beta that time the new .net framework based which called DNX which is now known as .Net Core. In this post, I will try again to create simple web application using the new .Net Core.

Trying from Yo

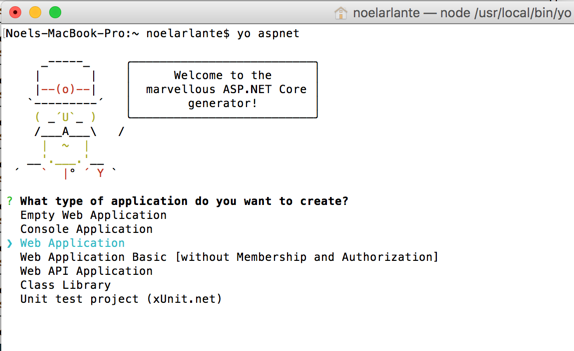
I will use Yeoman to help me with the scaffolding of a new web application.

 yo aspnet 

Yeoman

After yeoman generated a web application for me, a confirmation message is displayed that the new project is now created and I can do now a “dotnet restore”.

Dotnetrestore yeoman

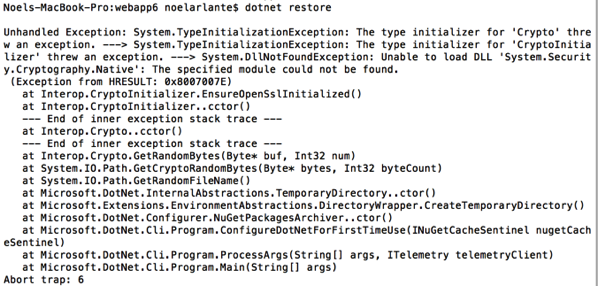
Going to the new web application directory I issued a command “dotnet restore” but I got a command not found error. I updated my Visual Studio Code just hoping to get an updated version of the framework along with it but to no avail.

Hello “Dotnet” .Net Core 1.0

Microsoft released last June of .Net Core 1.0 and along with it the new Dotnet CLI.

The DotNet CLI is included if you install the .Net Core SDK Installer. There is also a separate installer for .Net Core only.

You can get the installers straight from Github https://github.com/dotnet/cli/ (for the latest builds) or from https://www.microsoft.com/net/core

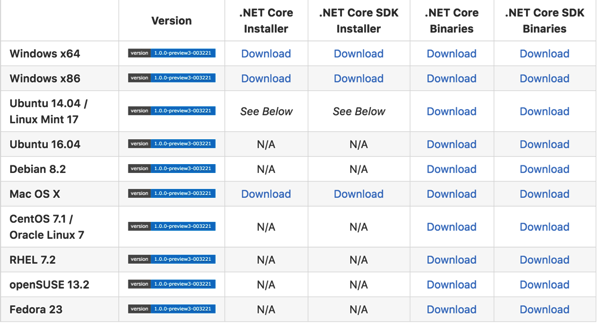
See all the flavours from the table below I got from the .Net Core Github repo:

Cli flavours

Sidenote:
Some hiccups along the way of updating my openSSL and brew. Need to execute “xcode-select —install” command to update. This is somewhat related to the El Capitan macOS that I have on my mac.

Sidenote

After installing the .Net Core with SDK, “dotnet” command is now available. As of today here’s my “dotnet —info”

Noels-MacBook-Pro:~ noelarlante$ dotnet --info
.NET Command Line Tools (1.0.0-preview2-003121)

Product Information:
 Version:            1.0.0-preview2-003121
 Commit SHA-1 hash:  1e9d529bc5

Runtime Environment:
 OS Name:     Mac OS X
 OS Version:  10.11
 OS Platform: Darwin
 RID:         osx.10.11-x64

Sidenote: “dotnet restore” still does not work. I’m getting an error related to this question posted on Stackoverflow . I’ll post an update once this has been resolved.

Sidenote2

Until next time!

Enable Web Proxy On OSX Using Shell Script

Terminal icon osx 150x150

I’ve been using a VPN Tunnel to get me a US ip address so I can watch Netflix. My VPN provider, Ironsocket has a Web proxy I can configure on my browser to enable me to access Netflix and other sites that checks for ip location. Once I’m done watching Netflix I would like to disable the web proxy. It’s very easy in OSX to disable or enable the web proxy in your browser System Preference -> Network -> Advanced -> Proxies, but its easier if it will be done through a shell script. Here is how to enable web proxy on OSX using shell script.

Creating the shell script

You can use any text editor you’d like in OSX. I use vi to create mine. Here is the script:

Shell Script Content

echo "Setting proxy to" $1
networksetup -setwebproxystate Wi-Fi $1
networksetup -setsecurewebproxystate Wi-Fi $1

The important command is the networksetup. Its the system command to use if you want to do anything with your OSX network setup.

I’ve just passed in the protocol I want to configure, this case its only the Web Proxy (-setwebproxystate) and Secure Web Proxy (-setsecurewebproxystate). I also passed in the name of the network adapter I want to configure which (Wi-Fi) and the $1 is just the parameter I passed in from the command line.

Running the shell script

Running the shell script will require you to have Admin rights since this will change a system setting. To run the script as Admin use the command sudo. Here is how I run the script.

Running the script with result

The echo command in the script will be print the last command you made.

That’s it. You now can enable web proxy on OSX using shell script. Hope this helps!

Permission Denied Error On Npm Install For Yeoman

Yeoman 007

I was trying to create a simple ASP.Net 5 project by using generator like Yeoman on my Mac. The instructions on ASP.Net docs website are simple and easy to follow. However I encountered a permission denied error on npm install for Yeoman.

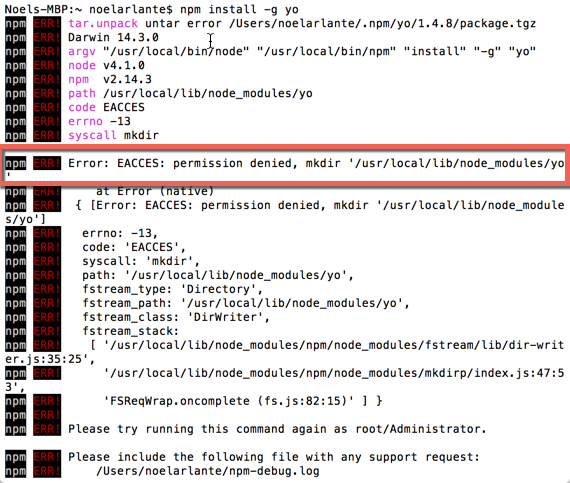
Npm Error Permission Denied

Initially I thought I was not running an updated npm version so I tried to execute npm upgrade, but it did not work. I also tried to install again npm getting the installing from nodejs.org but the same error occurs.

Looking closely at the log, it was a permission error on a mkdir on /usr/local/bin folder. This was verified when I go to that folder and tried to create a folder but a permission error occurs. Getting closer to the root of the problem!

Wheels

When I looked into the owner and group permissions in the folder, the group owner for node_modules (where the install is targeting the mkdir) is a group name wheel. The group name wheel seems to have been related to the roots of MAC OS X from Unix.

Wheels MacOS Permission

I issued two commands to gain permission to the folder.

sudo chgrp -R admin node_modules

sudo chown -R whoami nodel_modules

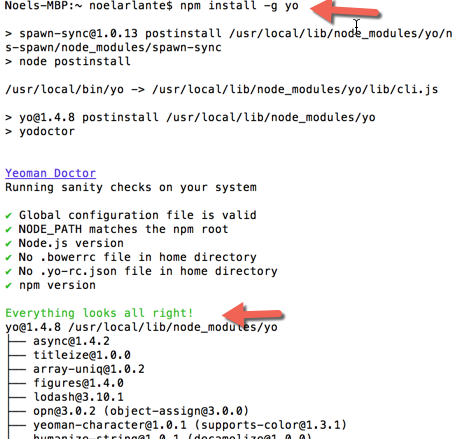
After gaining permission to the folder, I once again tried to install Yeoman using npm and the installation went through this time.

Npm yo Ok now

I hope this will save you time if ever you encounter the same problem on your way to trying more ASP.Net 5 samples.

Mirroring On MacBook Causes Page To Shrink

Here is the background

I usually stream movies on my MacBook Pro and then mirror it to my TV to make the viewing much enjoyable, obviously because of the screen size. Here is the setup, my Macbook Pro connected to my TV through a mini display port to HDMI cable. It’s a common setup when you want to connect your laptop to your TV or any display.

The problem?

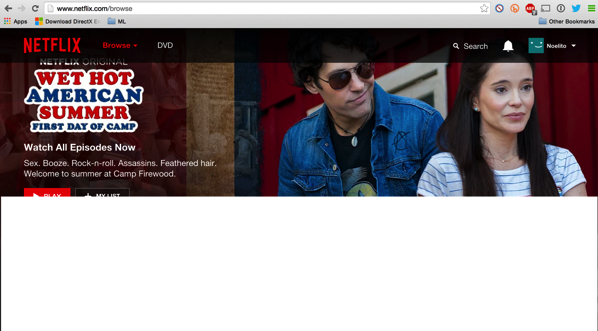
The problem is when I connect my Macbook Pro to the TV, the Macbook Pro’s display will refresh and you should expect the display to be mirrored to the TV display. Yes, the mirroring happens but page turns into a display shrank into half. The shrank page is also mirrored in the TV display which does not happen to the rest of the open tabs. See below what I mean.

Page Shrank in Half

There are times I preload the movie like in Netflix or other stream sites so you can buffer the whole movie before starting to watch. Then the shrinking happens when you connect it to your TV. Not good.

It worked! Here is the trick

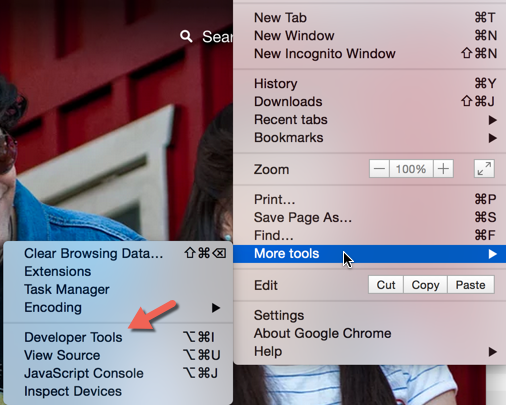
You can alway close and then open again the page that shrank but in case you encounter the issue you can always to do this trick to solve the issue. I tried to move the page, resize the page, minimize/maximize the page but it does not work. Then I tried to open the Developer Tools (Option + Command + I) and then close it.

Chrome Developer Tools Options Bar

It worked, the page goes back to full screen mode without opening or closing the page. Saving anything I buffered in the page. Cool.

Taking Visual Studio Code and ASP.Net 5 For A Spin

Visual Studio Code Setup

Visual Studio Code Download

https://code.visualstudio.com/Download

Visual Studio Code (VSCode) is the latest free cross platform lightweight IDE from Microsoft. Visual Studio Code and ASP.Net 5 are being released as free and open source.

Initial Impressions for Visual Studio Code

Pros:

  • Lightweight IDE
  • Support for many Languages with IntelliSense
  • Git Integration
  • Open Folder
  • Easy Split Window Navigation
  • User and Workspace settings in JSON

Cons:

  • Does not support regions for C#
  • Keeps hanging when you use on large .Net solutions (Open Folder)

ASP.Net 5 Setup

According to Microsoft, DNX was built entirely from the ground up. The ASP.Net 5 was also created from the ground up, meaning all ASP.Net 5 projects are DNX projects. Good thing to note is that ASP.Net 5 is not anymore based from System.Web.dll. Things are built around the concept of packages and on demand references.

Windows

In order to install and run ASP.Net 5 from Windows, you will need to install the DNVM (Version Manager), DNU (Utility) and DNX (Execution Engine). The steps to install them can be found from this link.

OSX

A very cool new feature of ASP.Net 5 is that it can run and be developed in other platforms. I was very excited to try and develop ASP.Net on a non-Windows machine. It gave me enough reason to buy and upgrade my MacBook Pro 2008 to MacBook Pro 2015 ;).

Just like in Windows, you will need to install the DNX, DNVM and DNU. But this time, since its on OSX, everything will be dependent on Mono (.Net Open Source Project). You can get Mono by installing through Homebrew (package manager) in OSX. Actually, it works backwards, in Homebrew when you install the latest ASP.Net and DNX it installs Mono automatically since its a required package of ASP.Net.

Linux soon!

I do not have now a Linux machine to try and install ASP.Net 5 so next time I will post my ASP.Net 5 adventures with Linux!

Sample Project ASP.NET 5

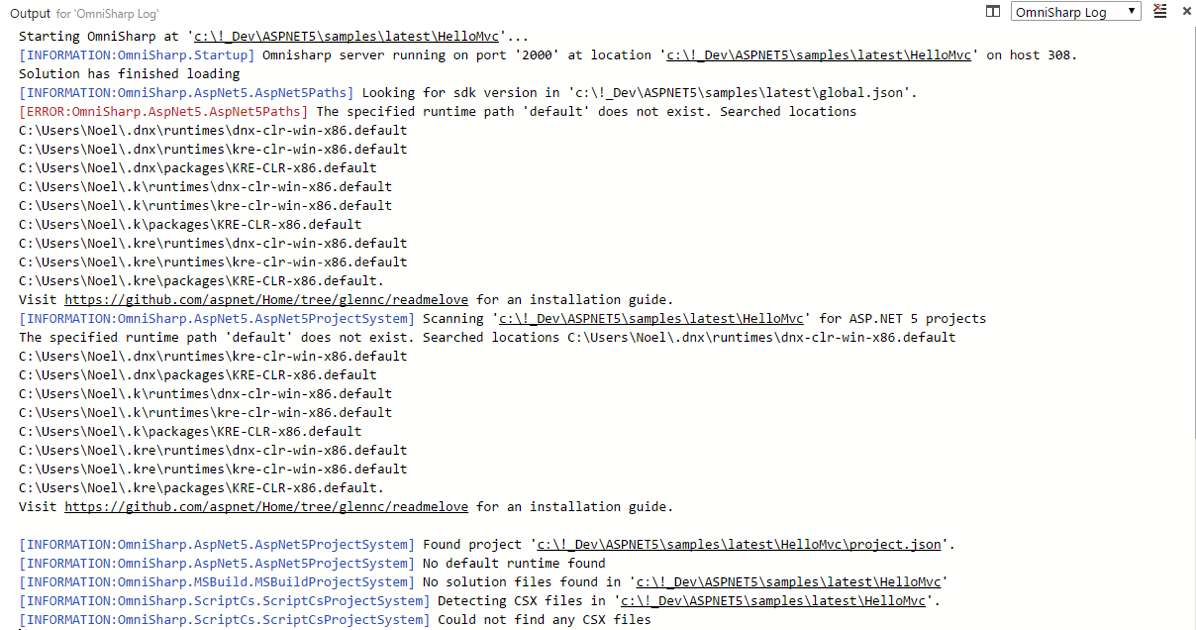
Omnisharp log – Error logged on opening the sample project

When opening the sample ASP.Net 5 DNX project with VS Code without first installing DNX, you will encounter an error logged under the Omnisharp log. This is a good way to know the sequence where it looks for the DNX framework.

Omnisharp log

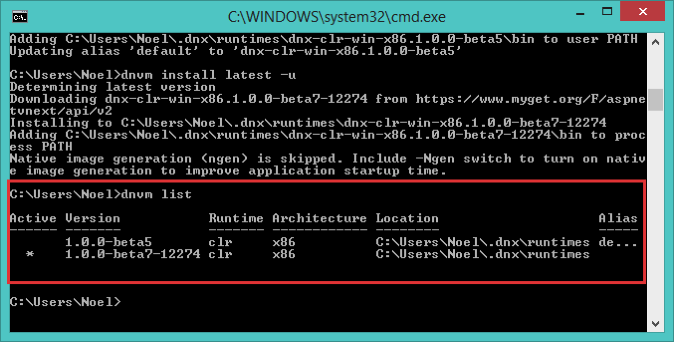
The DNX framework can be installed on your system like what I did when I followed the steps to initially setup DNVM, DNU, DNX amongst others. But you can also, make available the different DNX versions in your local by getting and compiling them from the Github repository. This way, you can test different versions of DNX from your system. Running DNVM list will show you different versions installed in your machine.

Two versions of DNX

Running the sample apps

There are sample projects up in the ASP.NET repository. You can download or clone them from Github.

I tried to open and run the web application under the HelloMVC sample folder. This is a sample MVC ASP.NET 5 project which you can open in VSCODE.

Inside the project folder, you can execute

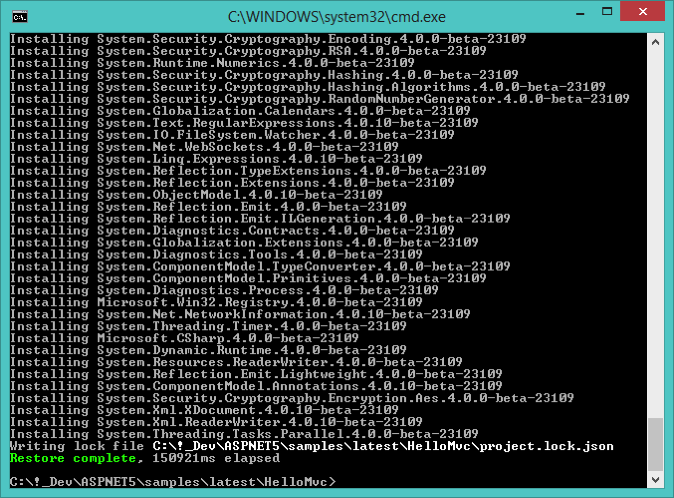
dnu restore

to make download the dependencies of the sample project. Visual Studio Code will also prompt you to do the restore.

DNU Restore VSCode Window

DNU Restore Complete

To execute and start the hosting of the project run the command

 dnx . web 

DNX WEB

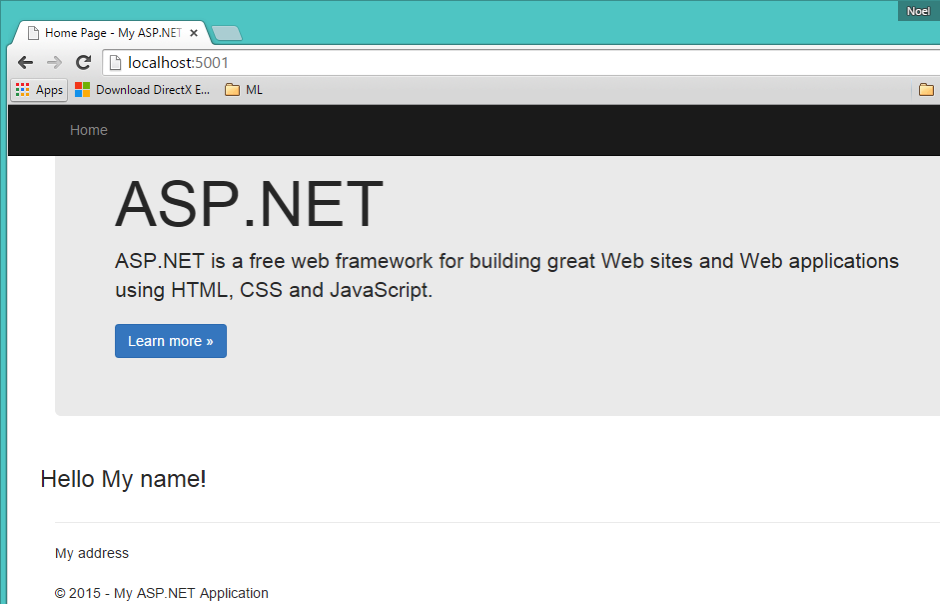
Open a browser and go to http://localhost:5001/ and you will see the sample MVC ASP.NET 5 project running.

Sample ASP NET 5 Website running

You can do the same steps to setup, compile and run the web project in OSX. As long as you have DNX installed you can start and run ASP.NET 5 projects. I’m trying to follow the latest in DNX and ASP.NET as a whole in Github – http://www.github.com/aspnet and try to contribute if possible 🙂 Thanks and until my next post!

Suppressed Exception On The Empty Catch Block

When you investigate an issue or a problem you usually get the error or exception message first and then try to replicate that exception in a lower environment such as your local machine. What if there was an error but the application did not produced a message or even a trace where the error occurred? Big problem. One such case to avoid this problem and to avoid passing this problem to the next person that will support your application, is to avoid having suppressed exception on the empty catch block on your code. Yes, having an empty catch block will not be detected by the C# compiler, bummer.

The culprit

public class SilentExceptionSample
{

public void DivideOperation(int a, int b)
{
try
{
var result = a / b;
}
catch (Exception)
{
//throw;
}

}

}

The code above is a sample method that does not return anything (void) and an operation to divide a and b. A try catch block will be able to catch any exception that may happen but throwing the exception that may happen is a different scenario. Inside the catch block, the C# compiler allows the block to be empty and not return anything. Most of the time this block can contain a logic to handle the exception such as logging and external error handlers. What happens if the developer leaves the block empty without the intention of leaving it empty? Errors in your application will not have any trace.

Some unit testing

[TestFixture]
public class SuppressedExceptions
{

[Test]
public void Division_With_Exception_Test() {

var silentException = new SilentExceptionSample();

Assert.Throws(() => silentException.DivideOperation(1,0));
}

[Test]
public void Division_With_NoException_Test()
{
var silentException = new SilentExceptionSample();

Assert.DoesNotThrow(() => silentException.DivideOperation(1,1));
}

}

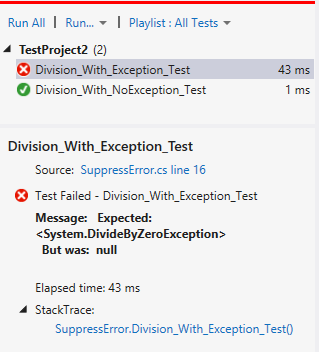
I created a unit test to test the exception, on this sample above its the DivideByZeroException, that the method will throw when you divide a number by zero. The test fails in the first scenario since the error suppressed exception on the empty catch block.

Test Results

Ways to avoid

There can be ways to avoid this code smell. I suggest the following…

Unit Test

– Perform unit tests on exception handling on your code.

Code Snippet

– Use the code snippets on Visual Studio. If you want to use a try catch block, typing in “try” then tab will auto complete the whole block.

Resharper

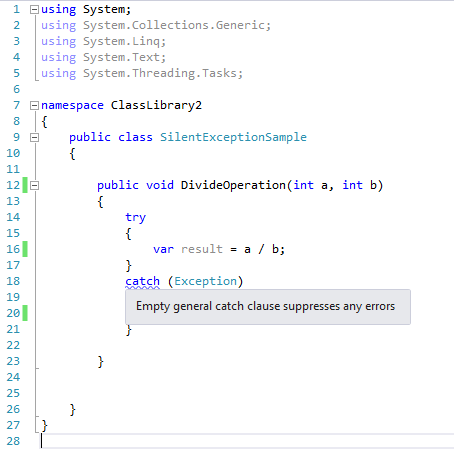
– Tools such as Resharper can help in detecting code smells. See the warning below from the Resharper engine on the empty catch block.
Resharper Warning

This type of code smell can be the source of problem you are investigating now or something you can prevent while in development. You’ve been warned! 🙂

Snipping Tool Slow Response On New Snip

I recently encountered the snipping tool slow response on new snip on my Windows machine. It is causing which I call COD or “cause of delay” when I’m doing my work and trying to finish on time. What happens is when you capture a screen using the Snipping Tool, your machine just freezes up to 4 to 6 seconds before you can get the new snip and move around with your system. Yes, that is a hassle when all you want is to capture the screen. The Snipping Tool was a reliable tool in Windows until I encountered this issue.

Snipping Tool Slow Response Happens Only With Internet Explorer

I made a search in Google and found that this issue only happens when capturing the Internet Explorer screens. To try this I launched the Snipping Tool and made a new snip. I tried to capture the screen from my Chrome browser, it worked. I tried to capture the screen from my desktop and it worked as well. I went back to capture the screen from my Internet Explorer. Voila, my system instantly froze again!

How To Resolve The Issue on Snipping Tool Slow Response On New Snip

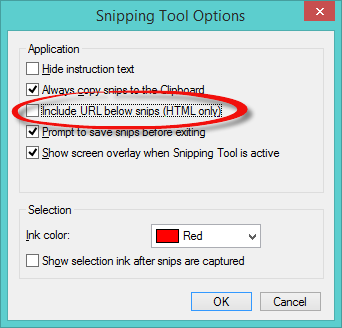
Under Tools, go to Options. The Snipping Tool Options will have an option for “Include URL below snips (HTML only)”. Uncheck that option and then try again to capture your Internet Explorer screen.

Snipping Tool Options


You will notice that capturing the screen on your Internet Explorer will now work with normal response and without freezing your system. Hope this helps. If you have other Snipping Tools tip, please share them in the comments section. Thanks! 🙂